Categories:
__________________________________________________________

Monday, November 29, 2010

Goodbye Worm Bin 2a! Hello Worm Bin 2b!

Well my worms in Worm Bin 2a are now in the arms of someone else in Novaliches.  Take care of them!  That was a nice bin too.  But I'm not sad at all.  I'm glad that more Pinoys are getting into the worm habit.  I'd gladly be the provider that gives access to vermicomposting hobbyists. 

Anyway, I'm also glad someone purchased the bin because I got to create a new one!  And it's such fun making worm bins.  Is that odd or what?   I swear this whole vermicomposting thing is so addictive that I don't just blog about it; now I even upload worm bin videos on Youtube!

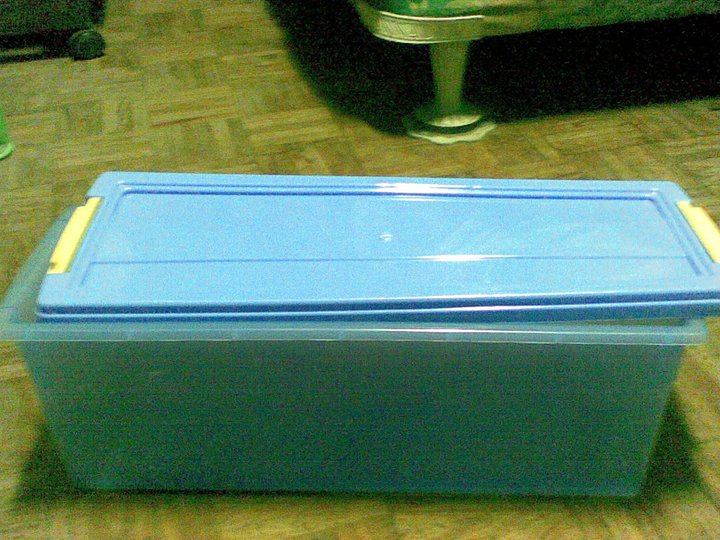
My new bin is so handy because it's a little smaller than my old bin, but it's also a little deeper so there's not much volume trade off.  Like the predecessor bins, it has locking mechanisms so you can lug it around.  Even better, this new bin has a handle!

Whereas in my prior bin, I put really small holes all around the bin and some big ones on the lid, this time around, I put in 12 big holes on one side.  I think that would be enough to provide my African Nightcrawlers with enough air.  I covered the holes with stockings material though to make sure my worms don't go meandering at night.  Hopefully, the stockings material will also keep ants out.

Finally, I added some old bedding and some semi finished vermicompost from my other bins and placed them in the new one.  There being a microbial community already, I can immediately add my worms to the new bin.  I made sure not to add too much material though because I want my worms accessible (read: I want to poke around the bin and play with the worms every single day!) 

And that's that!  Do keep reading my Quezon City vermicomposting adventures!


Tuesday, November 23, 2010

Lavender Update

Here's my lavender!  It looks a lot bigger from last month, huh?  I guess it really helps that it's in the sunniest part of the yard.  You'd never know it, but I've been nursing this particular plant for half a year already!   You don't see it clearly in the picture, but the pot looks too small and the soil is fairly limited.  Why is that good?  Lavender likes it sunny and dry!  Even if it rains, the pot dries up rather quickly.  It looks so good these days that I'm thinking of getting cuttings from it.  I've been refraining since a lot of my plants die after pruning.   Maybe it's a thing with the shears

Friday, November 19, 2010

Worm Bin 4 Update: Decomposition Over Time

Guess what?  My E51 decided to work today.  So I was able to take pictures of my worm bins.  Today, I'll show you Worm Bin 4, which is a 5-gallon Round Container sawed in two.  The pictures will show the bin's content level on Novembers 4, 10 and 19.


The series of shots shows a constant but slight decline in the volume.  A lot of it is probably the moist paper compressing, but I'd like to believe it's also reflecting some of the decomposition going on (natural, through the mushrooms, and by the worms).  Surprisingly enough, this bin has been leaking moisture even though I've not been spraying it with water.  I may have underestimated the amount of moisture that organic materials contain.  Apparently, most organic materials have high water content.

If you recall, I added some substrate from Worm Bin 3 (tray) which had some mushroom growth.  Why?  Well I've read that mushrooms help with the decomposition process as well.  And after the mushrooms are done, the worms can eat the remains.  And they can eat the fungi too (there must be a lot since there are mushrooms). Considering that I just put in a handful of worms in this bin, that's a win-win situation.  Where are the mushrooms?  Just look at the white string-like things in the bin.  Those are mushrooms.  And the black parts are ink from the mushroom heads and remnants of the original worm substrate. 

I think the way this bin has been progressing, I'm betting it'll look pretty good in three months.


Vermicomposting and Herb Gardening in Manila: Updates

It's been a busy week in the garden but not everything has been positive.  The Lavender that I've been tending to for months has been looking really good.  The plant size to soil ratio has increased.  From what I read, that's a good thing.  Why?  Well Lavender likes it dry.  In fact, repotting the plant can be counter productive because the bigger pot will have more soil and therefore a higher tendency to be wet.  In fact, I think that's why my Lavender got sick in the first place.  I put it in a big pot.  Now, I really just water it when the leaves are drooping.  Same thing with my Rosemary.

Sorry, I don't have out-of-focus pictures today.  My camera phone's acting up.  I'll have it fixed in a week or two.  Can you believe it though?  It costs P500 to get my keypad fixed in Circle C.  And that was just two months ago I think. 

My Peppermints are all dying!  It's amazing in an awful kind of way because I have about three different locations and they're all suffering.  There's some sort of rust I can't figure out.  Plus, the dang caterpillars love mint leaves.  I also have spiders all over and they're webbing all over my herbs.

Even my Cinnamon Basil has been struggling as of late.  In fact, in the backyard, they're almost devoid of leaves.  Man, insects must really enjoy mints and basil.  In contrast, my Cat's Whiskers have been flourishing in the damp soil in the backyard.  I think caterpillars don't find the leaves tasty.

As for my 5-gallon indoor container vermicompost experiment, things look positive.  The content level has really gone down by about half.  And since I introduced some mushrooms from my other bin about a week ago, mushrooms have sprouted all over the bin.  Great, huh? They'll help my few worms there decompose the bin contents.  In fact, I'm now thinking they can have the job done in 3 months.

I also gathered some vermicompost from my Worm Bin 1 over the weekend.  I got one and a half venti-cups worth of vermicompost which I spread all over my garden (especially to the sick ones).  Hopefully, things will improve with my sick plants.  I also observed from Worm Bin 1 that the worms are now eating faster.  I think the worms have both matured and multiplied since a few months ago.  In fact, I can feed them about a half cup of leaves and banana peels every three or four days.  Yes, that's a major improvement.  In fact, I think I can gather vermicompost over the weekend again (yeah, it's just an excuse to play with my worms).

As for Worm Bin 2a, I've received an inquiry from Naga.  I just realized I don't know how to ship African Nightcrawlers from Manila to other locations in the Philippines.  I asked Air 21.  They're not into shipping live cargo.  I wonder if LBC will do it.  Hmmmm...In any case, I'm really excited that someone wants to buy it, not so much because I'll earn something, but because it gives me an excuse to create another new bin!  In fact, whenever I'm in Landmark, I get captivated by the different plastic containers and I wonder which one will be my next worm bin project.

Well this is a bit long already. Hopefully, my upcoming updates will come with out-of-focus pictures again.


Wednesday, November 10, 2010

What Does Vermicast Look Like?

If you're new to worm composting, you might be wondering what worm castings look like.  After all, they're always shown from afar.  Collectively, they look like dark soil.  Right?  So is there any way to distinguish them from soil or from coffee grounds?  I believe so.  I took these pictures earlier.  They're as close as my camera zoom will take me.

To totally mess up your sweet tooth, I kinda think worm castings look like chocolate sprinkles on cake.  And that's basically how you can tell.  Vermicast is shaped like a small capsule.  The particles aren't round at all.  So even if coffee grounds are the same color, you can easily tell them apart from castings.


And those are my two cents for today.

Footnote:  My worm bin 1 has started performing better ever since I covered the contents with a whole newspaper (apart from the worm bin lid).  I'm not sure why that is, but now I see new worm poo on top of the heap every single day. 


Friday, November 05, 2010

Goodbye Worm Bin 2! Hello Worm Bin 2a!

Well I have to say goodbye to Worm Bin 2.  Someone bought it.  Lucky guy.  It was my best performing bin.  From about 8 worms at the start of October, it was up to 47 as of yesterday.  Talk about population explosion!  The funny thing is that I'm not sure why it performed so well, whereas Worm Bin 3 (Worm Tray) is such a flop.  Sure it had mushrooms, but the population actually dwindled from 8 to 6 in a couple of weeks.  Strange since it had the best aeration; in contrast, Worm Bin 2 had no drainage and just a few holes.  Tsk.

Anyway, like a true worm head, I was nonetheless happy because I got to create a new bin.  I shall christen it Worm Bin 2a since I patterned the design from the first one.  As you can see, it looks exactly like Worm Bin 2, only this time it's blue (my favorite color).  But this time I resolved to do it in a cleaner fashion.  The last time, I discovered that it was hard to punch holes in hard plastic using a screwdriver or an awl.   I also think I've learned my lesson after stabbing myself recently.

This time around, I used a soldering iron.  I can't remember where I got the idea, but I figured this would be an easier way to put holes in the bin.  And it costs about 3% of what a power drill would cost.  True enough, one the iron was hot, it easily melted small holes into the container.  I was done with the holes in about 5 minutes (although it comes with fumes).

Similarly, I also melted holes at the top.   Those are big holes but I made sure to tape some stockings cloth underneath to prevent pests from coming or my worms from escaping.    The difference now though is that I also melted holes at the sides.  Why?  Well, if I ever need to stack bins (looking forward to more worms!), air can still circulate in the bin.

Finally, I taped some glossy paper around the sides because my bin is quite transparent and worms don't like light.  I made it a lot neater than my first one too.  I actually measured the stuff I taped around so it doesn't look messy. 

As a final point, I still didn't put any drainage since it is a small bin and I have absolute control with the moisture level.   With all the steps replicated, all that's left now is to get a couple of worms (along with the substrate) and to place them on this bin.  I'll moisten the contents now and then but I probably won't put any more food or bedding just yet.  I don't have to inoculate the bin since I'll be putting existing substrate. 

And that's a wrap!


Thursday, November 04, 2010

Worm Bin 3 Update: Mushrooms in My Worm Tray 2

In my last Worm Bin 3 update, I talked about mushrooms sprouting in my vermicompost tray (on top and at the bottom).  I wasn't sure if mushrooms were beneficial to the worm bin so I kept cutting of the heads, just to be safe. 

But the I found out that lots of other people have observed mushrooms sprouting in compost bins.  Apparently, it's because mushrooms tend to thrive in the same environment as the worms (about 25 degrees Celsius, moist, and dark).   It in fact serves as an affirmation that the bin conditions are alright. 

I also have an interesting thread in redwormcomposting.com going on and they're saying that mushrooms do help in the decomposition process.  In fact, mushrooms can go through a lot of newspaper!   In my case that's great because this worm tray is under-wormed -- that is, I didn't put a lot of my little African Nightcrawlers there.  If those mushrooms can help with the decomposition process, they can suck out all the paper they want.  After a while when it gets competitive in terms of food, the mushrooms can just die down and be food for the worms. 

Footnote: I've been told that decapitating a mushroom does not kill the organism.


Wednesday, November 03, 2010

Vermicomposting Challenge: 10 Worms, 5 Gallons of Organic Material

Just a week ago, I finished creating my own indoor compost container / vermicompost bin.  As you can see from the edges, I'm not much of a handyman.  ;-)   Just a week later, it was already full. Okay, I may have been a little excited putting in new material from all over (mostly pruned herb leaves).   I also put in food scraps.  However, since it was indoors and since the bin has an air vent (lid not shown here), I added more dry bedding each time I started to smell something funny.  I didn't exactly want my house to smell like a garbage can. Besides, I need a 30:1 C:N ratio, right?   Once I deemed that what I will now refer to as Worm Bin 4 was full, I placed it in my little back area.  Then I wet the contents with some urine.  That should give the "feedstock" better nitrogen content.

A day later, I got the contents of my ice cream container "worm box".   If you look at the picture, you'll see that there's some good decomposition going on.  The contents are predominantly dark brown and as you can see from the sides, there are castings.  When I last counted, there were about a dozen worms here of varying sizes.  Pretty small, right?

I transferred about 10 of those worms (along with the substrate) into the Worm Bin 4.  I'm no longer concerned about the ammonia from the urine since the bin didn't reek of it.  I think the substantial bedding did its part in absorbing the urine.  Furthermore, I'm also not concerned about aging the bin a little more before introducing worms since I added the worms along with the half-processed substrate.  That means they definitely have something to eat for the next couple of weeks.  That also means the worms have a safe place to stay in case parts of the bin heats up when the organic matter decomposes.

So here's the challenge.  I'll stop feeding Worm Bin 4.  I'll spray additional moisture as required (to hasten decomposition, to keep worms alive and to discourage ants from entering the bin), but no more addition of food or bedding.  How long do you think it will take for 10 original worms (some are babies!) to fully process a 5-gallon bin full of organic material?  Things to factor in: 1) I've read that low density is a hindrance to worm reproduction; 2) The contents are not pre-composted; 3) I threw in a couple of the mushrooms growing in Worm Bin 3 to help with the decomposition; and 4) There's just one big air vent on top.    4 Weeks?  4 Months?  1 Year?

As a footnote, until I get a lot more worms, I think I will need about 4 5-gallon bins to rotate.  

Tuesday, November 02, 2010

Worm Bin 3 Update: Mushrooms in My Worm Tray

A couple of days ago, while checking on my worm bin / flow through tray, I was surprised to see mushrooms sprouting.  In the morning I saw two.  When I checked back in the afternoon, there were like 3-4 more.  Not being sure if they were good for the worms, I cut off the tops to kill the mushrooms.  Yesterday, this is what I saw.  A lot of new mushrooms sprouted.  I'm not sure what type of mushrooms these are, but they have a white stem and a black head.  The head is also "inky" and in fact is staining my tray black.

This morning, naturally I saw a couple more.  But to my surprise, when I lifted the tray to see if any new vermicast has fallen through, I found mushrooms growing upside down!  If only my herbs were as persistent, I'd be a great gardener.  It remains to be seen if these mushrooms will make good worm food.  Let's see.


Monday, November 01, 2010

Vermicompost Experiment: Will Vermicompost Help Cure a Sick Mint?

Yesterday I decided to gather some vermicompost from my Worm Bin 1.  After sifting, I got some, but not a lot  as you can see from the picture.  It seems my bin is still too wet to allow for efficient vermicast harvesting.  The contents were all clumped together.  From the picture, you'd also see that some worms (African Nightcrawlers) went through the sifter.  I returned them to the bin of course (albeit a bit dizzy).

I then got my sick Chocolate Mint.  As you can see, the plant looks ravaged.  I think some caterpillar ate all the leaves.  I removed some soil from the pot and replaced it with the vermicompost I gathered.   Then it's a wait and see game.  Will the supposed beneficial microbes help my chocolate to recover?  Time will tell.

As a footnote, I also placed some new cardboard bedding (thank you Pizza Hut!) to Worm Bin 1 to make it look like a proper worm bin and not a hodgepodge of food and bedding.  I'll also let it dry out for a week before I try harvesting anything again.


Related Posts with Thumbnails